 |
Overview
This guide explains how to configure Progress Monitoring at Project Level once the company-level configuration has been completed.
The configuration process consists of:
- Request & Licence Approval
- Company Configuration
- Project Configuration
- Schedule Creation
- Reporting Configuration
- Validation & Go Live
- Purpose: Guide Project Administrators through configuring a project for Progress Monitoring, including permissions, presets, task structures and reporting.
- Who It’s For:
- Delivery Team
- Professional Services
- Solution Consultants
- Internal Administrators
Prerequisites:
Compant-level progress Monitoring has been configured
A Schedule Template has been created at Company-level
Required permissions are available
You know whther the project is using PM Lite, PM Pro or PM Sync
WBS (if applicable) has been agreed
Step-by-Step Instructions
✅ Step 1: Setting up your project
Your project structure is the foundation of Progress Monitoring.
Why Your Project Structure Matters
A well-planned project structure is essential for accurate Progress Monitoring.
Your locations determine:
- Where tasks are deployed.
- How progress is recorded.
- How dashboards summarise completion.
- How reports are filtered and grouped.
- How project teams navigate the project.
If your locations or drawings are poorly organised, schedules become difficult to manage and reporting may not accurately reflect the project's progress.
Before creating a Progress Monitoring schedule, your project must be correctly structured. This includes uploading your Drawing Sets, Drawings, and defining your Locations and adding your Teams
These elements form the foundation of your project and determine how progress is planned, recorded, and reported throughout the lifecycle of the project.
Drawings
Individual drawings are uploaded into the appropriate Drawing Set, making them easy to locate when creating schedules and recording progress.
Locations
Locations represent the physical areas of your project where work will be carried out.
Depending on the project, your location structure may include:
- Building
- Block
- Floor
- Zone
- Apartment
- Room
Locations provide the hierarchy used to assign work and record progress at the correct level.
Teams
Teams represent the contractors, subcontractors or internal departments responsible for completing work.
Before building your schedules, create the teams that will be responsible for delivering each stage of the project.
Each team is assigned ownership of tasks, making it clear who is responsible for progressing work.
- Upload all drawings, drawing sets and locations required for Progress Monitoring.
- Using locations allows progress to be tracked by building, floor, apartment, room or any project hierarchy.
- Add Users/Teams
For more guide please see here
https://snagr-support.freshdesk.com/a/solutions/articles/103000409619?lang=en
Best Practice

Take time to design your location hierarchy before creating schedules. A logical and consistent project structure makes schedules easier to build, simplifies progress updates, and produces more meaningful reports and dashboards.
✅ Step 2: Configure Project Presets
Project Presets define the default values and configuration options used within a specific project. They ensure schedules, tasks, reporting, and other Progress Monitoring features are configured consistently across the project.
Unlike Company Presets, which apply to every project within a company, Project Presets allow you to tailor settings to the requirements of an individual project.
If a project contains more than one schedule, each schedule must be assigned a unique Schedule Tag (code) to distinguish it from the others. This code typically reflects the schedule period or reporting dates (for example, W01, Jan-26, Phase 1, etc.), depending on your reporting standards.
Your Schedule Tag must exactly match the corresponding Project Preset value. If these values do not match, Progress Monitoring reporting and dashboards may not display the correct data.
- Project Presets define the tags used throughout Progress Monitoring.
Update the required preset values using the Progress Monitoring Tag Matrix.
| Preset | Reasoning | Type | Example |
|---|---|---|---|
| Schedule 1-Code | For projects with more than 1 schedule you must add a code for each schedule relating to the dates.Your Schedule Tag MUST match your Preset | Text | PM-Lite |
| Schedule 1-Planned End Date | For projects with more than 1 schedule you must add an End Date for each schedule relating to the Code | Text | DD/MM/YYYY 31/12/2026 |
| Schedule 1-Planned Start Date | For projects with more than 1 schedule you must add an Start Date for each schedule relating to the Code | Text | 01/07/2025 DD/MM/YYYY |
✅ Step 3: Create Task set profile
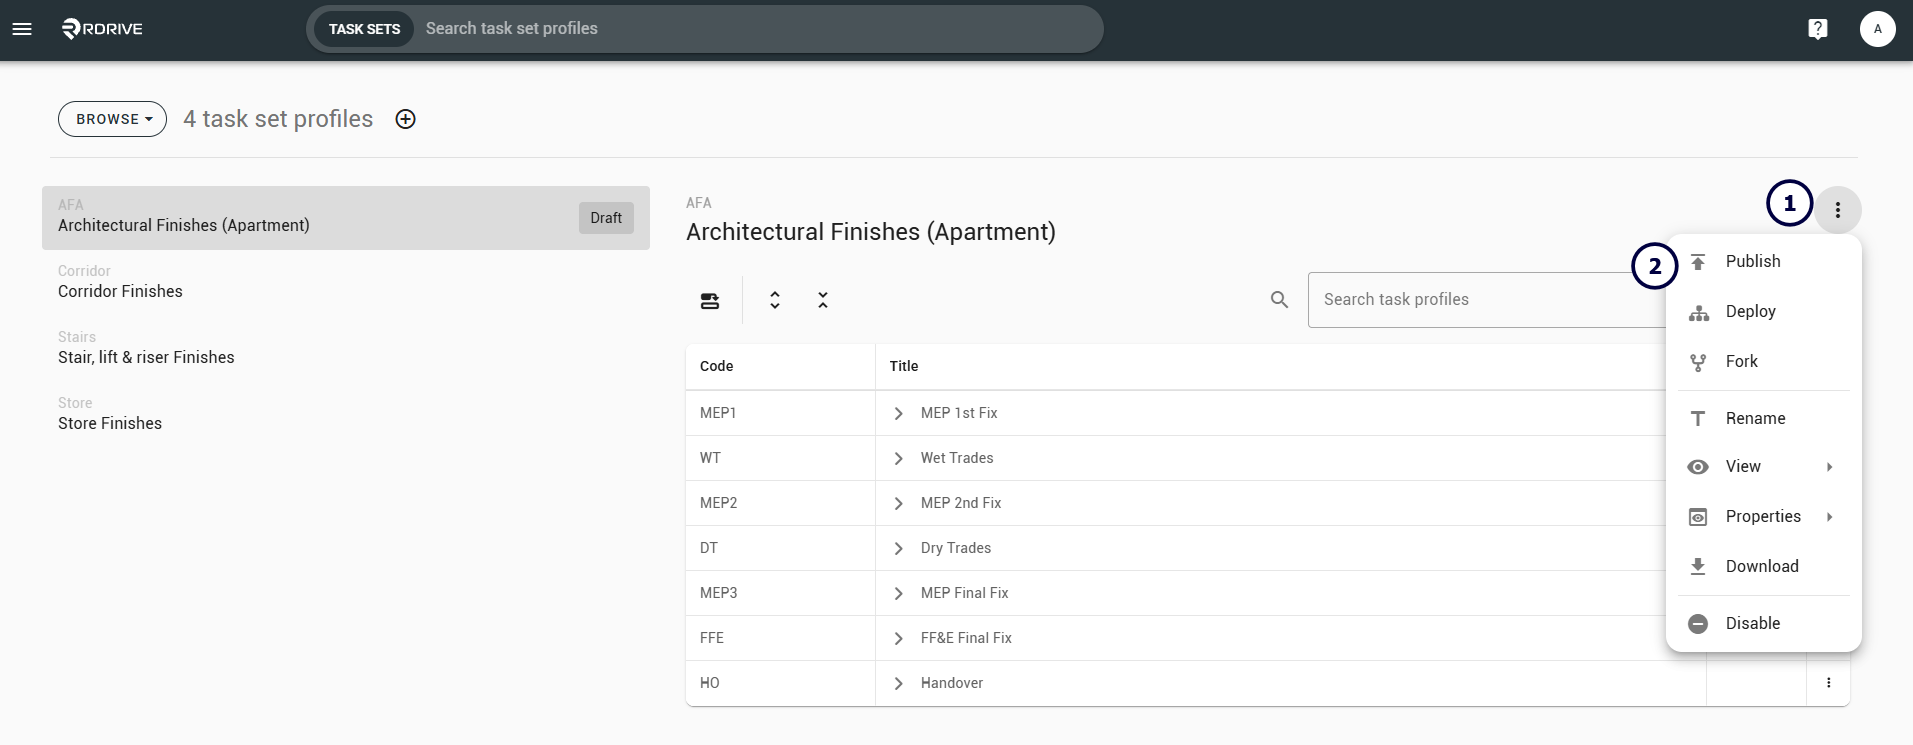
Task Set Profiles are reusable collections of tasks that can be deployed to one or more locations within a project. They allow you to define a standard sequence of work once and reuse it throughout the project, ensuring consistency and reducing manual effort.
For example, if every apartment, room, or floor follows the same construction process, you can create a single Task Set Profile and deploy it wherever required, rather than recreating the same tasks multiple times.
Benefits of Task Set Profiles
Using Task Set Profiles helps you to:
- Standardise task structures across the project.
- Reduce the time required to build schedules.
- Ensure all locations follow the same workflow.
- Maintain consistent reporting and progress tracking.
- Easily update future schedules by modifying the profile.
Create a Task Set Profile
- Navigate to Project → Settings → Task Set Profiles.
- Select Create Task Set Profile.
- Enter a Name for the Task Set Profile (e.g. Apartments).
- Save the profile.
Add Task Sets
- Open the Task Set Profile you have created.
- Select Add Task Set.
- Nest the Task within the required TaskSet
Configure Task
For each Task:
- Select the required Item (i.e inspection or checklist)
- Set the required Lead Team.
- Configure any additional options required by your project i.e weighting value against the task
Review the Task Set and Publish
Before using the profile, confirm:
- All required Task Sets have been added.
- The Task Sets are in the correct order.
- The correct Teams and Lead Teams have been assigned.
- Publish the Task Set profile
✅ Step 4: Build the Schedule
Option A (Recommended) - Task Manager
The Task Manager provides the quickest and most efficient way to create a Progress Monitoring schedule, particularly for larger or more complex projects.
Rather than manually creating every task within RDrive, Task Manager generates a spreadsheet template that contains your project structure. You can then populate the schedule in Microsoft Excel before importing it back into the project.
This approach significantly reduces schedule creation time and ensures tasks can be created consistently across multiple locations.
From Dashboards → Task Manager
1. Create Schedule
Select Create Schedule to begin the schedule creation wizard and start with Option 1 Generate Spredsheet Tempalte
This will guide you through selecting the project information required to build your schedule.
2. Select a Schedule Template
Choose the appropriate Schedule Template.
3. Select Drawing Sets, Drawings & Locations
The schedule uses your project structure as its framework.
Choose the Drawing Sets, Drawings, and Locations that will be included in the schedule.
This is why setting up your project correctly in Step 1 is so important.
When the schedule is generated, RDrive uses the selected Drawing Sets, Drawings, and Locations as the framework for your schedule. Any tasks or Task Set Profiles you import will be linked directly to these locations, allowing progress to be recorded against the correct area of the project.
For example, if your project contains:
- Building A
- Floor 1
- Apartment 101
- Apartment 102
- Floor 1
Important

Your schedule can only be created from the Drawings and Locations that already exist within the project. If these are incomplete or incorrectly structured, your schedule and subsequent reporting will also be incorrect. Always verify your project setup before generating the schedule.
4. Select the Work Breakdown Structure (WBS)
A Work Breakdown Structure groups tasks into logical sections, making schedules easier to manage and allowing progress to be reported at different levels of the project.
Choose how the schedule will be organised.
You can either:
- Automatically generate the WBS using the project's Location hierarchy (recommended).
- Define your own WBS if the project requires a custom reporting or construction structure.
5. Generate the Spreadsheet
Once your options have been selected, click Generate Spreadsheet.
RDrive will create an Excel template containing the project structure you have selected.
6. Complete the Spreadsheet
Once the spreadsheet has been generated, there is no need to manually create every individual task.
The spreadsheet already contains the project structure, including the selected Locations and Work Breakdown Structure (WBS). Your role is simply to assign the appropriate Task Set Profile to each task level where work will be carried out.
If your project uses PM Sync (Date Scheduling), you can also populate the scheduling information within the spreadsheet before importing it into RDrive.
This includes fields such as:
- Planned Start Date
- Planned Finish Date
- Duration (where applicable)
When the schedule is imported, RDrive automatically deploys all of the tasks contained within each Task Set Profile to the associated location.
This means you only need to define what type of work should occur at each location, rather than recreating every individual task.
Tip

Think of the spreadsheet as a mapping tool. You're not building the tasks themselves—you are telling RDrive which Task Set Profile belongs at each location. RDrive then creates the complete schedule automatically.
✅ Step 5: Reporting
Raise a request to the support team on Support@rdrive.io
- Title: Progress Monitoring Request – [Company Name]
Include in description:
- Customer Name
- Domain URL
- Project URL
- Progress Monitoring Licence
Before requesting reporting:
- Confirm Schedule Tags are correct.
- Confirm Task Set Profiles have been deployed.
- Raise at least one Progress Item.
- Complete the Progress Item.
- Confirm progress updates correctly.
FAQs & Troubleshooting
Q: Why is my schedule not appearing on the dashboard?
A: Check that the Schedule Tags match the Project Presets and that at least one Progress Item has been completed.
Q: Why is progress remaining at 0%?
A: Check that weighting has been configured on the Progress Monitoring fields.
Q: Why can't I raise a Progress Item?
A: Ensure you belong to the Lead Team assigned to the Task.
Q: Can I manage multiple schedules within one project?
A: Yes. Configure each schedule within the Project Presets and ensure each schedule uses the correct Schedule Tags.
Q: Why can't I see planned dates?
A: Planned dates are only available when using PM Pro or PM Sync schedule templates.
Was this article helpful?
That’s Great!
Thank you for your feedback
Sorry! We couldn't be helpful
Thank you for your feedback
Feedback sent
We appreciate your effort and will try to fix the article