 |
Overview
Custom Positioned Items allow you to record Issues and Processes at a precise position on a project drawing.
Unlike a Location-based Item, which is associated with a Location, a Custom Positioned Item is given a specific X/Y coordinate and appears as a pin on the drawing.
Pins provide a visual way to see where Items are located and their current status.
This guide explains how to raise, find, view and manage Custom Positioned Items in RDrive.
- Purpose: Learn how to raise and manage Custom Positioned Items (pins) on project drawings.
- Who It’s For: Project users who need to raise or manage Items at specific positions on drawings.
Prerequisites: Access to an RDrive project, the required Drawing and Locations, and permission to create or manage the relevant Item type
New to Items?
See Understanding Items in RDrive for an introduction to Issues, Processes, Location-based Items and Custom Positioned Item
Raising & Managing Custom Positioned Items
Raise an pin on the app, add a photo, find the Issue again, add a comment and progress its status.
What is a Custom Positioned Item?
A Custom Positioned Item is an Issue or Process placed at a specific X/Y coordinate on a project drawing.
The Item appears as a pin at the selected position.
Custom positioning is useful when the exact position of the Item is important.
For example:
- A defect on a wall
- Damage to a specific door
- An observation at a particular point
- A fire door or other asset
- An inspection relating to a specific installation
- A Process associated with a precise area of work
Both Issues and Processes can be Custom Positioned.
Understanding Pins
The pin is the visual representation of a Custom Positioned Item on the drawing.
Its position shows where the Item is located.
Its colour represents the current status of the Item.
This allows project teams to review a drawing and quickly identify where Items have been raised and their current progress.
Good to know: Statuses, workflows and pin colours can vary depending on how your RDrive project has been configured.
Raising a Custom Positioned Item
Custom Positioned Items are raised directly against a project drawing.
Raising an Item from the Location
[VIDEOPLACEHOLDER – Selecting a Location and placing a pin on the app]
- From the main menu, open View Plans.
- Navigate to the required Drawing.
- Select the relevant Location.
- Select + to add a new Item.
- Select the required Issue or Process.
- Select the position on the drawing where the Item should be located.
- Confirm the position of the pin.
- Complete the required Item information.
- Add photographs or supporting information where required.
- Complete all mandatory fields marked with *.
- Select Save.
The Item will now appear as a pin at the selected position on the drawing.
Raising an Item Using Add Item
You can also start by selecting + Add Item from the Plan Viewer.
- Open the required Drawing.
- Select + Add Item.
- Select the required Item type.
- Select the Location the Item relates to.
- Position the pin at the required point on the drawing.
- Complete the Item information.
- Save.
Tip: Particulary useful if your drawing is particulary busy with items
Quick Add
The RDrive mobile app provides tools to reduce repetitive data entry.
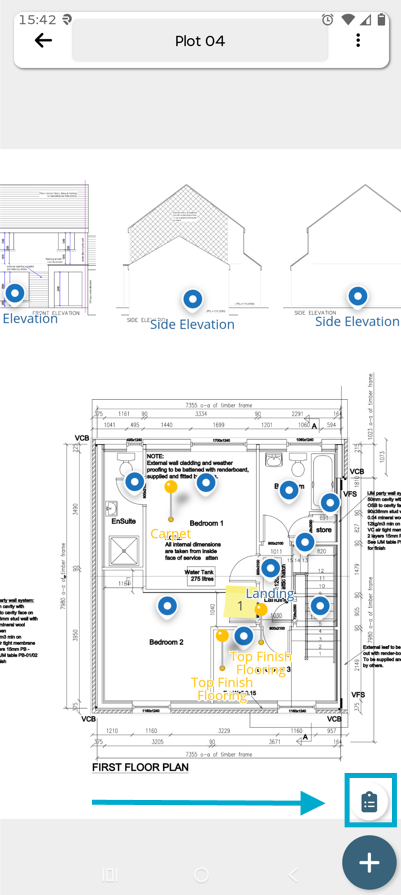
After creating an Item on the mobile app, Quick Add can be used to create another Item of the same type against the same Location. This can be found onthe bottom right of your screen once your first item is raised
This is particularly useful when recording several similar Items within the same Location.
Moving a Custom Positioned Item (Pin)
If you place a Custom Positioned Item in the wrong position on the drawing, you can move the pin to the correct position before the Item has been synchronised.
Moving the pin changes its X/Y position on the drawing. It does not change the Item's Location or the information recorded against it.
Important: You can only move a newly raised pin on the mobile app before you synchronise your device.
How to Move a Pin
- Long Press the Pin to open the menu
- Open the Menu and Select Move
- Drag the pin to its correct position on the drawing.
- Select PLACE to confirm the new position.
The Item will now appear at its new X/Y position.
Can't see the Move option?
Check whether the Item has already been synchronised. Once synchronised, the pin can no longer be moved using the mobile app.
Removing a Custom Positioned Item
If you raise a Custom Positioned Item by mistake, you can remove it from the mobile app provided it has not yet been synchronised.
⚠️ Important: Deleting an Item cannot be undone. Make sure you have selected the correct Item before confirming.
Tip
Deleting an Item from the Mobile App can only done before synchronised.
Once the Item has been synchronised, it can no longer be removed from the mobile app.
A synchronised Item must be removed using RDrive Web, subject to the user's permissions.
How to Remove an Item Before Synchronising
- Press and hold the pin to open the Item menu.
- Select Delete.
- Select OK to confirm.
The Item and its pin will be removed.
⚠️ Once the Item has been synchronised, it can no longer be removed from the mobile app.
A synchronised Item must be removed using RDrive Web, subject to the user's permissions.
Next Steps
Now that you know how to raise and manage Custom Positioned Items, continue with the guide for the Item type you're working with.
Managing Issues in RDrive
Learn how to view and update Issues, progress them through their workflow, add comments, manage subscribers, view history and work with linked Items.
[LINK PLACEHOLDER – Managing Issues in RDrive]
Managing Processes & Forms in RDrive
Learn how to work with Processes and their Forms, complete and update Form content, progress Forms through their workflows, collaborate with other users and manage related information.
[LINK PLACEHOLDER – Managing Processes & Forms in RDrive]
FAQs & Troubleshooting
Q: Is a pin always a defect or snag?
A: No. A pin represents a Custom Positioned Item, not necessarily a defect.
It could represent an Issue such as a defect, snag or observation, an asset record such as a fire door or sprinkler, or a Process such as an inspection or installation.
Q: Can both Issues and Processes be raised as pins?
A: Yes. Both Issues and Processes can be Custom Positioned and appear as pins on a drawing.
Q: Does every Item need to be positioned as a pin?
A: No. Items can either be Location-based or Custom Positioned.
A Location-based Item is associated with a Location without having a precise position on the drawing. Use a Custom Positioned Item when identifying the exact position is useful.
Q: What does the colour of a pin mean?
A: The pin colour represents the current status of the Item.
The statuses and colours available will depend on how your RDrive project and Item types have been configured.
Q: Why can't I see the Item I want to raise?
A: The Items available to you depend on your Team, permissions and project configuration.
If you expect to see an Item type and it isn't available, contact your Project Administrator.
Q: What's the difference between raising from a Location and using Add Item?
A: Both methods create the same Custom Positioned Item.
Select the Location first when you already know where the Item belongs.
Add Item can be particularly useful on busy drawings, allowing you to select the Item and Location before positioning the pin.
Q: Can I raise more than one similar Item quickly?
A: Yes. After raising your first Item, use Quick Add at the bottom-right of the screen.
Quick Add allows you to create another Item of the same type against the same Location, reducing the number of steps required when raising several similar Items.
Q: Can I change the position of a pin if I put it in the wrong place?
A: Yes, provided the Item has not yet been synchronised.
Before synchronising, you can move the pin to the correct position. Once the Item has been synchronised, it can no longer be moved from the mobile app.
Q: Can I remove an Item I've raised by mistake?
A: Yes, provided the Item has not yet been synchronised.
Once an Item has been synchronised, it cannot be removed from the mobile app and must be removed using RDrive Web, subject to your permissions.
Was this article helpful?
That’s Great!
Thank you for your feedback
Sorry! We couldn't be helpful
Thank you for your feedback
Feedback sent
We appreciate your effort and will try to fix the article