A Comprehensive Guide to Setting Up Assignment Rules
An Assignment Rule is a powerful feature that allows users to pre-assign data automatically when adding a new record. This ensures that the data remains editable, correctly assigned, and consistent with predefined criteria. In this guide, we'll cover how to configure and apply assignment rules effectively using the website interface.
Why Use Assignment Rules?
Assignment rules help automate the assignment of records based on specific criteria, such as form status, attributes, or field data. They streamline workflows, ensure consistency, and reduce manual errors. Here’s a step-by-step guide on how to set up and use them.
TABLE OF CONTENTS
- Step 1: Accessing Assignment Rules via the Website
- Step 2: Configuring the Assignment Rule
- Step 3: Finalizing and Saving the Assignment Rule
- Additional Actions: Editing or Removing Rules
- Key Points to Remember
- Conclusion
Step 1: Accessing Assignment Rules via the Website
1. Open the Menu
- Log in to the website.
- Click the menu icon in the top-left corner.

- Go to Settings > Categories and select the appropriate category and subcategory.


2. Open the Form Viewer Page
- In the Profile section, select the form you want to configure. Double-click on the form or use the Settings button to open the form viewer page.

3. Configure the Rules
- Click on the three dots (⋮) and select the Rules button.


- To add a new rule, press the ADD button. To modify an existing rule, click on the rule to edit it.

Step 2: Configuring the Assignment Rule
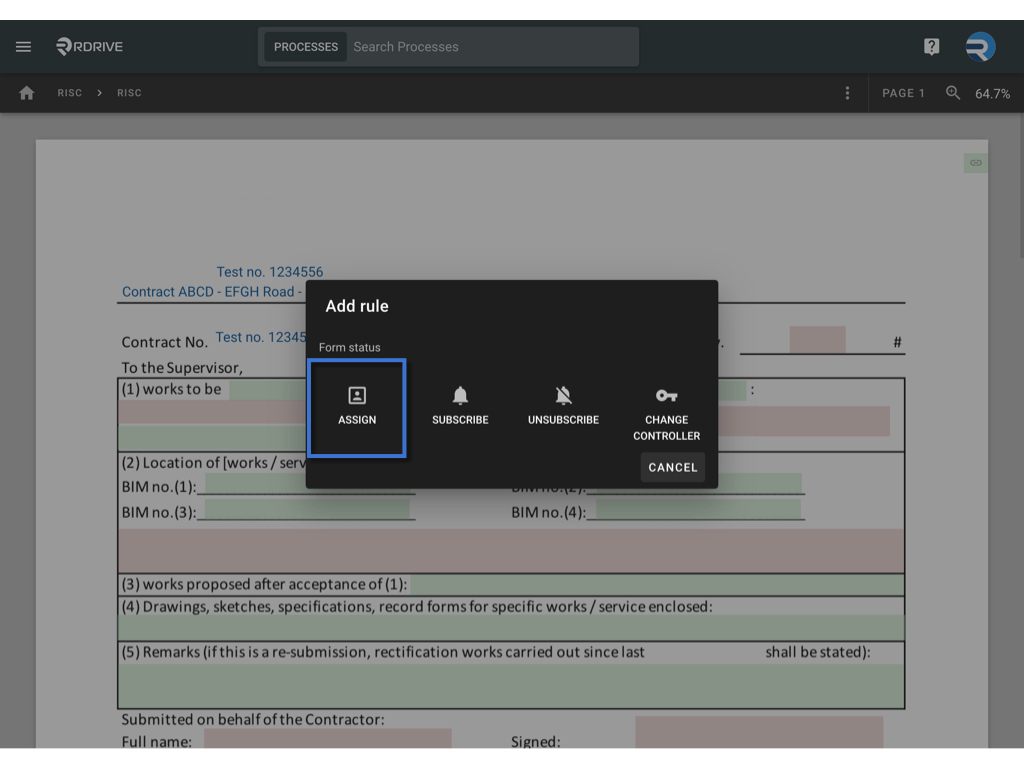
1. Select Rule Operation Mode
There are four types of rule operation modes: ASSIGN, SUBSCRIBE, UNSUBSCRIBE, and CHANGE CONTROLLER. For this guide, we’ll focus on the ASSIGN mode.
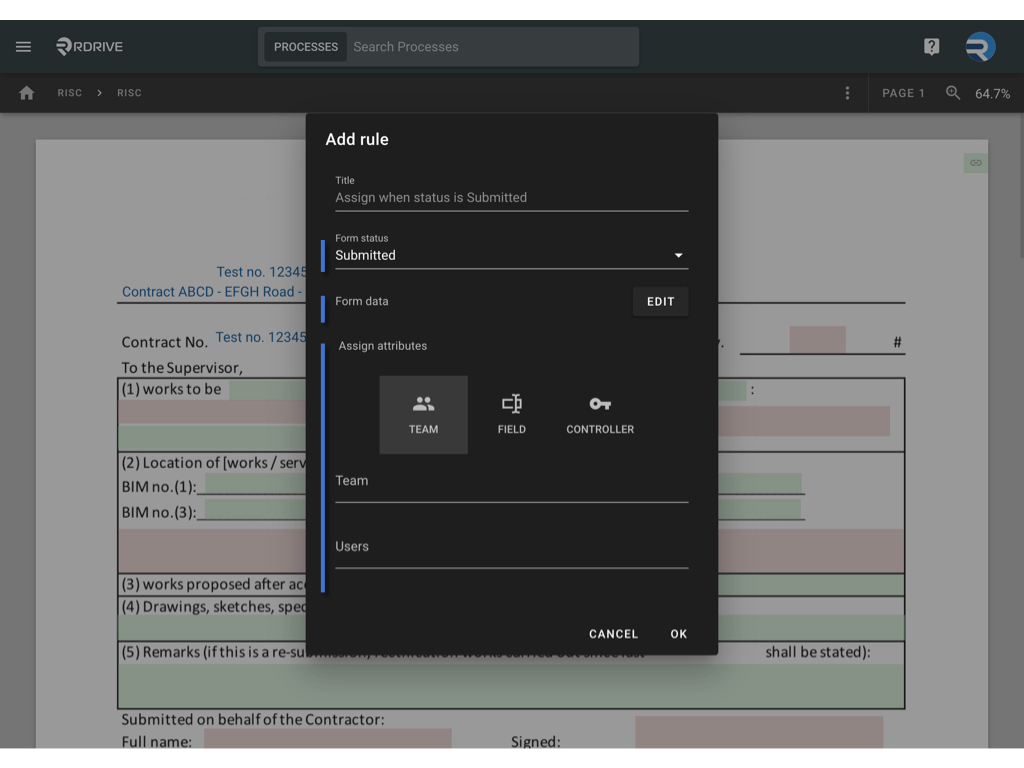
2. Define the Rule Parameters
Form Status
- Choose a form status that will trigger the assignment rule. The rule is activated when a record updates to the chosen status.

Assign Attributes
- Assign the form to a specific team or user. This is a required setting for every assignment rule. You have three assignment options:
- TEAM Assignment: Select a team and specify the user(s) within that team.
- Field-Based Assignment: Click Add Field and pick a team field or team + user field from the form. This option assigns the record based on the selected field value.
(Note: The rule will not be triggered if the data of selected User team and team field have no relationship.) - Controller: Assign the record to the current controller.
(What is controller?)
In this guide, we’ll use TEAM as an example, assigning the form to the entire "Management" team.
Form Data (Optional Condition)
The Form Data optional condition allows you to add specific criteria based on field data within the form. By setting these conditions, you can further refine when the assignment rule is triggered, ensuring that records are assigned only if they meet the defined field values. This feature provides more control and flexibility in automating record assignments based on form content.
- Add extra conditions based on field data, if desired:
- Click Edit to access the conditions.

- Select Add to define the condition, choosing the relevant form field(s) and specifying values.


- There are operator options based on the data type, such as contain, equal, empty, filled, or range, which you can select if needed.


- Click OK to confirm.

- Click Edit to access the conditions.
Step 3: Finalizing and Saving the Assignment Rule
After defining all the rule elements, click OK to save. Your new assignment rule is now added.

Additional Actions: Editing or Removing Rules
To Edit a Rule
- Click directly on the rule, make the necessary changes, and click OK to save.


To Delete a Rule
- If you need to delete a rule, click the Delete Rule button at the bottom left of the dialog box.

Click on the blank area of the page to exit the configuration screen.
Key Points to Remember
- Form Status and Assign Attributes are mandatory for every assignment rule.
- Form Data is optional and only needed if you want to add field-based conditions.
Conclusion
Assignment rules provide an efficient way to streamline record assignments, automate processes, and ensure data integrity. By following these steps, you can configure assignment rules tailored to your project’s needs, reducing manual effort and improving workflow consistency.
Was this article helpful?
That’s Great!
Thank you for your feedback
Sorry! We couldn't be helpful
Thank you for your feedback
Feedback sent
We appreciate your effort and will try to fix the article